How to set up a raised garden bed for spring
Hey there, garden enthusiasts! Are you ready to dive into the wonderful world of raised garden beds? In this guide, I'll walk you through of the spring garden bed preparation. Whether you're a seasoned gardener or just starting out, this article will equip you with all the information you need to get your raised garden bed thriving and producing beautiful blooms and bountiful harvests. So, grab your gardening gloves and let's get started on creating your own little oasis of greenery!
Spring garden bed prepare
Setting up a raised garden bed has numerous benefits. First, it provides better drainage for your plants, preventing them from getting waterlogged. Second, the raised bed creates a barrier against weeds and pests, reducing the need for chemical pesticides. Third, it allows you to control the quality of the soil, ensuring that your plants receive the right nutrients. Additionally, raised beds can extend your growing season by warming up the soil faster in the spring. Lastly, they make gardening more accessible by reducing strain on your back and knees. It's a win-win situation for both you and your plants!
Things to consider before doing a spring raised garden bed preparation
Before setting up a raised garden bed, there are a few things to consider. Firstly, think about the size and shape of the bed, ensuring it fits well in your desired location. Secondly, determine the amount of sunlight the area receives throughout the day to ensure it's suitable for your plants. Additionally, consider the type of soil you have and whether you may need to amend it for optimal plant growth. Lastly, think about accessibility and convenience when choosing the height and width of your raised garden bed. Taking these factors into consideration will help set you up for success in creating a thriving garden.

1. Selecting the Right Location
Selecting the right location for your raised garden bed, there are a few things to consider. Firstly, choose a spot that receives at least 6-8 hours of sunlight per day, as most vegetables and herbs thrive in full sun. Additionally, ensure that the area has good drainage to prevent waterlogging in your raised bed. Consider the proximity to a water source for easy watering. Lastly, think about accessibility - placing the garden bed near your home will make it convenient to tend to your plants and harvest fresh produce. With these factors in mind, you can create an ideal location for your raised garden bed.
2. Choosing the ideal spot for your raised garden bed
Choosing the perfect spot for your raised garden bed, I recommend finding an area in your yard that receives a good amount of sunlight. Aim for at least 6-8 hours of direct sunlight per day, as most vegetables and herbs thrive in full sun. Look for a location with good drainage to prevent waterlogging in your raised bed. It's also helpful to consider the proximity to a water source for easy watering. Lastly, placing the garden bed near your home will make it convenient to tend to your plants and harvest fresh produce.
3. Ensuring proper sunlight and drainage
When selecting the location for your raised garden bed, it's important to ensure proper sunlight and drainage. I recommend choosing a spot that receives at least 6-8 hours of direct sunlight per day, as most plants thrive in full sun. Additionally, make sure the area has good drainage to prevent waterlogging in your raised bed. This can be achieved by ensuring the ground is sloped or by adding drainage material such as gravel at the bottom of your raised bed. By providing adequate sunlight and drainage, you'll set your plants up for success in their new home.
Building Your Raised Garden Bed

To build your raised garden bed, there are a few key things to consider. Firstly, you'll need to choose the right materials for your bed. Options include wood, stone, or even recycled materials like old pallets. Once you have your materials, follow a step-by-step guide to assemble your raised garden bed. This may involve cutting and measuring the pieces, attaching them securely, and creating a sturdy base. Remember to take accurate measurements and ensure the bed is level before filling it with soil. Building your own raised garden bed is not only rewarding but also allows you total control over the size and design of your garden space!
Types of materials for building a raised garden bed
There are several options for materials. One popular choice is wood, such as cedar or redwood, which is durable and naturally resistant to rot. Another option is using stone or bricks for a more decorative look. If you're looking for a budget-friendly option, consider using recycled materials like old pallets or even cinder blocks. While, there is also another material, galvanized metal raised garden beds are also popular among gardeners for less maintenance and rust-free. Whichever material you choose, make sure it is safe for gardening and will last in outdoor conditions.
Step-by-step guide to assembling the raised garden bed
First, gather all the materials and tools you will need, including your chosen building material (wood, stone, bricks), screws or nails, a drill or hammer, and a level. Next, measure and mark the desired dimensions of your raised garden bed on the ground using stakes and string. Begin constructing the frame by attaching the boards or stones together with screws or mortar. Make sure to check for levelness as you go. Once the frame is complete, line the bottom with landscape fabric to prevent weeds from growing through. Finally, fill the bed with soil and start planting!
Soil and Fertilizer for your raised bed garden

Setting up a raised bed garden, choosing the right soil is crucial for the success of your plants. I highly recommend using a high-quality garden soil that is rich in organic matter and has good drainage capabilities. This will ensure that your plants have the nutrients they need and that excess water doesn't accumulate in the bed.
Additionally, adding compost or other organic matter to the soil can provide additional nutrients and improve the overall fertility of the bed. As for fertilizers, organic options such as compost tea or worm castings are great choices to promote healthy plant growth without synthetic chemicals. Remember, a healthy soil equals healthy plants!
Choosing the right soil for your raised garden bed
Choosing the right soil is crucial for the success of your plants. I always prefer using high-quality garden soil that is rich in organic matter and has good drainage capabilities. This ensures that my plants have the nutrients they need and prevents excess water from accumulating in the bed. Additionally, adding compost or other organic matter to the soil provides extra nutrients and improves overall fertility. Remember, a healthy soil equals healthy plants!
Composting Materials
- Cow Manure
- Horse Manure
- Sheep Manure
- Marine Compost (shellfish, seaweed, etc.)
- Various Animal Manures
- Worm Castings
- Kitchen Scrap Compost
- Yard Waste Compost
- Purchased Compost
Learn about Which Soil Is Better for Plants: Acidic soil or Alkaline Soil.
Selecting the right plants for a spring garden

When selecting plants for your spring garden, it's important to choose ones that thrive in the cool, mild temperatures of this season. Look for plants like lettuce, spinach, kale, broccoli, and cauliflower that are cold-tolerant and can withstand fluctuating temperatures. Flowers like pansies, daisies, and tulips add vibrant colors to your garden. Consider planting herbs such as basil, parsley, and mint for a delicious addition to your meals. Remember to check the sunlight requirements and spacing recommendations for each plant before making your selections. Happy gardening!
Tips for watering, pruning, and pest control
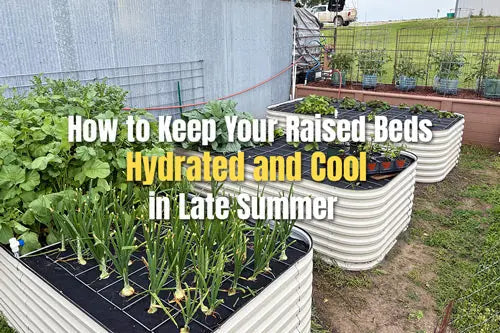
When watering your raised bed, it's important to provide adequate moisture without overwatering. I recommend checking the soil moisture regularly and giving your plants a deep watering when needed. Pruning is another essential aspect of garden maintenance. Regularly remove any dead or damaged branches to promote healthy growth. Let's try some proper watering techniques for plants in raised beds.
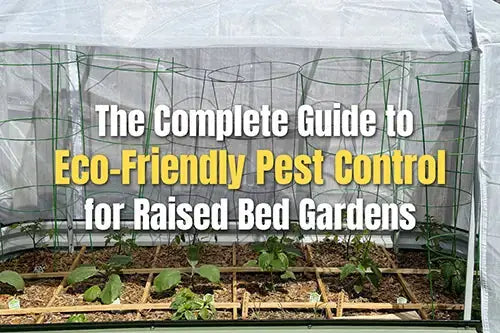
Additionally, keep an eye out for pests like aphids or snails. Implement natural pest control methods such as organic sprays or introducing beneficial insects like ladybugs to keep your garden thriving. Remember, a little TLC goes a long way in maintaining a successful spring garden!
When to harvest your spring crops
In my experience, the best time to harvest spring crops is when they are at their peak of ripeness. For most vegetables and herbs, this means harvesting them when they have reached their full size and vibrant color. You'll know it's time to harvest when you can easily pull or cut the crop from the plant without any resistance. Remember that different crops have different harvesting times, so do a little research on each specific plant to ensure you pick them at their prime.
Preparing the garden bed for future seasons
Once the spring season comes to an end, it's important to prepare your garden bed for future seasons. First, remove any leftover plant debris and weeds from the bed. This will help prevent pests and diseases from lingering. Next, amend the soil by adding organic matter such as compost or aged manure. This will replenish nutrients and improve soil structure. Lastly, cover the bed with a layer of mulch to help conserve moisture and suppress weed growth. By taking these steps, you'll be setting up your raised garden bed for success in the next growing season.
Conclusion
Setting up a raised garden bed for spring is a rewarding endeavor that can lead to a productive and beautiful garden. You can find more Garden beds at Canada Grow Supplies. By carefully choosing the location, building the bed, preparing the soil, planning your garden, and tending to your plants, you can enjoy a successful gardening season ahead. Raised beds offer several advantages, including better soil quality and drainage, which can result in healthier and more abundant crops. So, roll up your sleeves and get ready to reap the benefits of your raised garden bed this spring! Happy gardening!
By Charles Greenberg
Author bio: As a skilled writer, Charles distills his knowledge into engaging content, providing invaluable guidance to growers of all levels. His commitment to responsible cultivation aligns seamlessly with the company's ethos.

Can this be done on a cement slab?